Pre-requisites for Deploying NAI
In this part of the lab we will prepare pre-requisites for LLM application on GPU nodes.
The following is the flow of the applications lab:
stateDiagram-v2
    direction LR

    state PreRequisites {
        [*] --> CreateFilesShare
        CreateFilesShare --> PrepareHuggingFace
        PrepareHuggingFace --> [*]
    }
    state CreateOfflineHelmContainers {
        [*] --> PrepareNAIHelmCharts
        PrepareNAIHelmCharts --> PrepareNAIContainerImages
        PrepareNAIContainerImages --> [*]
    }

    [*] --> PreRequisites
    PreRequisites --> CreateOfflineHelmContainers
    CreateOfflineHelmContainers --> DeployNAI : next section
    DeployNAI --> TestNAI
    TestNAI --> [*]
Prepare the following pre-requisites needed to deploy NAI on target kubernetes cluster.
Create Nutanix Files Storage Class
We will create Nutanix Files storage class which will be used to create a pvc that will store the LLama-3-8B model files.
- In Prism Central, choose Files from the menu
- Choose the file server (e.g. labFS)
- Click on Shares & Exports
- Click on +New Share or Export
-
Fill the details of the Share
- Name - model_share
- Description - for NAI model store
- Share path - leave blank
- Max Size - 10 GiB (adjust to the model file size)
- Primary Protocol Access - NFS
-
Click Next and make sure Enable compression in checked
- Click Next
-
In NFS Protocol Access, choose the following:
- Authentication - System
- Default Access (for all clients) - Read-Write
- Squash - Root Squash
Note
Consider changing access options for Production environment
-
Click Next
- Confirm the share details and click on Create
Create the Files Storage Class
-
Run the following command to check K8S status of the
nkpdevcluster -
In VSC Explorer, click on New File and create a config file with the following name:
Add the following content and replace the
nfsServerNamewith the name of the Nutanix Files server name .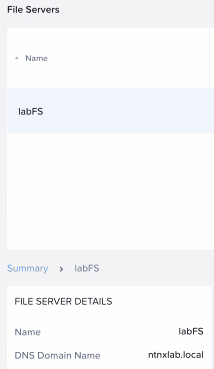
-
Create the storage class
-
Check storage classes in the cluster for the Nutanix Files storage class
kubectl get storageclass

NAME                       PROVISIONER                     RECLAIMPOLICY   VOLUMEBINDINGMODE      ALLOWVOLUMEEXPANSION   AGE
dkp-object-store           kommander.ceph.rook.io/bucket   Delete          Immediate              false                  28h
nai-nfs-storage            csi.nutanix.com                 Delete          Immediate              true                   24h
nutanix-volume (default)   csi.nutanix.com                 Delete          WaitForFirstConsumer   false                  28h
Request Access to Model on Hugging Face
Follow these steps to request access to the meta-llama/Meta-Llama-3.1-8B-Instruct model:
LLM Recommendation
From testing google/gemma-2-2b-it model is quicker to download and obtain download rights, than meta-llama/Meta-Llama-3.1-8B-Instruct model.
Feel free to use the google/gemma-2-2b-it model if necessary. The procedure to request access to the model is the same.
-
Sign in to your Hugging Face account:
- Visit Hugging Face and log in to your account.
-
Navigate to the model page:
- Go to the Meta-Llama-3.1-8B-Instruct model page.
-
Request access:
- On the model page, you will see a section or button labeled Request Access (this is usually near the top of the page or near the "Files and versions" section).
- Click Request Access.
-
Complete the form:
- You may be prompted to fill out a form or provide additional details about your intended use of the model.
- Complete the required fields and submit the request.
-
Wait for approval:
- After submitting your request, you will receive a notification or email once your access is granted.
- This process can take some time depending on the approval workflow.
Once access is granted, there will be an email notification.
Note
Email from Hugging Face can take a few minutes or hours before it arrives.
Create a Hugging Face Token with Read Permissions
Follow these steps to create a Hugging Face token with read permissions:
-
Sign in to your Hugging Face account:
- Visit Hugging Face and log in to your account.
-
Access your account settings:
- Click on your profile picture in the top-right corner.
- From the dropdown, select Settings.
-
Navigate to the "Access Tokens" section:
- In the sidebar, click on Access Tokens.
- You will see a page where you can create and manage tokens.
-
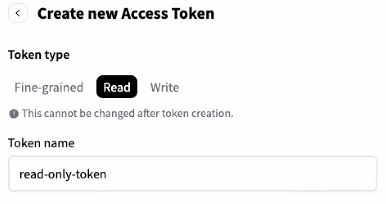
Create a new token:
- Click the New token button.
- Enter a name for your token (i.e.,
read-only-token).
-
Set token permissions:
- Under the permissions dropdown, select Read. For Example:
- Under the permissions dropdown, select Read. For Example:
-
Create and copy the token:
- After selecting the permissions, click Create.
- Your token will be generated and displayed only once, so make sure to copy it and store it securely.
Use this token for accessing Hugging Face resources with read-only permissions.
Prepare Helm Charts
In this section we will prepare the helm charts necessary for NAI and pre-requisite applications install
- NAI
- Envoy Gateway
- Kserve
- OpenTelemetry Operator
The procedure will be done on the jumphost VM.
-
Login to Nutanix Portal using your credentials
-
Go to Downloads > NAI Airgapped Bundle
-
Copy the download link for NAI air-gap helm bundle
-
Open new
VSCodewindow on your jumphost VM -
In
VSCodeExplorer pane, click on existing$HOMEfolder -
Click on New Folder name it:
airgap-nai -
On
VSCodeExplorer plane, click the$HOME/airgap-naifolder -
On
VSCodemenu, selectTerminal>New Terminal -
Browse to
airgap-naidirectory -
In
VSC, under the newly createdairgap-naifolder, click on New File and create file with the following name: -
Add (append) the following environment variables and save it
-
Source the
$HOME/airgap-nai/.envfile to import environment variables -
Download the NAI
2.7.0helm chart bundle from Nutanix Portal -
Extract the helm charts file
-
Login to Harbor registry on the command line (if not done so)
-
Create a project called
nutanixin the Harbor registry using the followingcurlcommand or simply use the Harbor GUI -
Upload the downloaded and prepared helm charts to Harbor
$ for chart in $(ls *.tgz); do echo "Pushing: $chart";helm push $chart oci://$REGISTRY/nutanix;done
Pushing: gateway-crds-helm-v1.7.0.tgz
Pushed: harbor.x.x.x.x.nip.io/nutanix/gateway-crds-helm:v1.7.0
Digest: sha256:625ee2409826d30e70ac26eb1a93e80650ba2c81464f65aaca6968cd33793b37
Pushing: gateway-helm-v1.7.0.tgz
Pushed: harbor.x.x.x.x.nip.io/nutanix/gateway-helm:v1.7.0
Digest: sha256:80ce6293c5a8658897971cd10adef51880a3ee6e5e1bbc92415b943cd4b94cb5
Pushing: kserve-crd-v0.15.0.tgz
Pushed: harbor.x.x.x.x.nip.io/nutanix/kserve-crd:v0.15.0
Digest: sha256:b673a75fdf45602ae58bb528e7b445e4530617b18f8eebb5d6337c16d4596951
Pushing: kserve-v0.15.0.tgz
Pushed: harbor.x.x.x.x.nip.io/nutanix/kserve:v0.15.0
Digest: sha256:e1bc365c75dd28f0c43581107b78614ffe21e6fbaf95a9351af440d3eec45130
Pushing: nai-core-2.7.0.tgz
Pushed: harbor.x.x.x.x.nip.io/nutanix/nai-core:2.7.0
Digest: sha256:2484532e59822e3c660aa4fa4a9152788d68bd51d1a47ea6e4b4884fa02bafe1
Pushing: nai-operators-2.7.0.tgz
Pushed: harbor.x.x.x.x.nip.io/nutanix/nai-operators:2.7.0
Digest: sha256:8a377a20f58f28500daab57730cf71bc4c7e2385615e061a9bd98e73ed47a978
Pushing: opentelemetry-operator-0.102.0.tgz
Pushed: harbor.x.x.x.x.nip.io/nutanix/opentelemetry-operator:0.102.0
Digest: sha256:bb3a48aeca0320a5c999b3849619e2d692eeec8ce59a6c43ca965c1fd1ffdb24
Prepare Container Images
The Jumphost VM will be used as a medium to download the NAI container images and upload them to the internal Harbor container registry.
stateDiagram-v2
    direction LR

    state LoginToNutanixPortal {
        [*] --> CreateDockerIDandAccessToken
        CreateDockerIDandAccessToken --> LoginToDockerCLI
        LoginToDockerCLI --> [*]
    }

    state PrepareNAIDockerImages {
        [*] --> DownloadUploadImagesToHarbor
        DownloadUploadImagesToHarbor --> [*]
    }

    [*] --> LoginToNutanixPortal
    LoginToNutanixPortal --> PrepareNAIDockerImages
    PrepareNAIDockerImages --> [*]
Upload NAI Docker Images to Harbor
Info
The download and upload of the container images will be done in one docker push command which will use the internal/private Harbor container registry details.
This will be a two-step process.
- Upload the container images from the downloaded
nai-2.x.x.tarto the jumphost VM local docker images store - Upload it to the internal Harbor container registry
-
Download the NAI air-gap bundles (NAI container images) from the Nutanix Portal > Downloads > Nutanix Enterprise AI
-
Since we will be using the same internal Harbor container registry to upload container images, make sure the following environment variables are set (these were already set during air-gap NKP preparation). Append (add) the following to your
$HOME/airgap-nai/.envfile -
Download this script (provided by Nutanix) from this location
Usage of image upload script provided by Nutanix
Use the upload script provided by Nutanix. Original location is on the portal.
You can also download a copy of the script using the commands below.
-
Change permission to execute on the script
-
Push the images to the jumphost VM local docker images store
< Snipped output >

→ [40/40] Processing: nutanix/nai-go-processor:v2.7.0
→ Tagging as: harbor.x.x.x.x.nip.io/nutanix/nai-go-processor:v2.7.0
→ Pushing to registry...
The push refers to repository [harbor.x.x.x.x.nip.io/nutanix/nai-go-processor]
68c62dd01600: Layer already exists
9f1399477dbf: Layer already exists
6fd88674c4ba: Layer already exists
14087c42d4b4: Layer already exists
2cb1f8643318: Layer already exists
ffcaa2070b2e: Layer already exists
a9f9b89dc1f2: Layer already exists
29df493baa13: Layer already exists
v2.7.0: digest: sha256:22d4558b118f0f5afb0d572e080f44dd6518d5365783222de21a721fa947b9ee size: 1993
✓ Pushed successfully

========================================
Summary
========================================
Total images loaded:    40
Successfully pushed:    40
Failed:                 0

✓ All images successfully pushed to harbor.x.x.x.x.nip.io/nutanix
Now we are ready to deploy our NAI workloads.