Deploying Unified Endpoints
stateDiagram-v2
    direction LR

    state FallbackUnifiedEndpointLab {
        [*] --> CreateAPIClientKeys
        CreateAPIClientKeys --> DownloadModel
        DownloadModel --> CreateLocalEndpoints
        CreateLocalEndpoints --> CreateUnifiedEndpoint
        CreateUnifiedEndpoint --> TestInitialQuery
        TestInitialQuery --> HibernatePrimaryEndpoint
        HibernatePrimaryEndpoint --> TestFallbackQuery
        TestFallbackQuery --> [*]
    }

    [*] --> PreRequisites
    PreRequisites --> SizingNKP_NAI
    SizingNKP_NAI --> FallbackUnifiedEndpointLab
    FallbackUnifiedEndpointLab --> [*]
Getting Started
To begin, log in to your Nutanix Enterprise AI UI. Navigate to the Endpoints section on the left-hand menu, and verify that your underlying cluster health is showing as optimal in the Infrastructure Summary.
At a high level, we will do the following:
- Download model
- Create two endpoints
- Configure Unified Endpoint with the two endpoints as backend
Pre-requisites and Sizing
So far we have been working with initial NKP cluster that was created in this section
We will need more resources for running the Unified Endpoint
Current NKP Cluster:
| Role | No. of Nodes (VM) | vCPU per Node | Memory per Node | Storage per Node | Total vCPU | Total Memory |
|---|---|---|---|---|---|---|
| Control plane | 3 | 4 | 16 GB | 150 GB | 12 | 48 GB |
| Worker | 4 | 12 | 32 GB | 150 GB | 36 | 128 GB |
| GPU | 1 | 20 | 40 GB | 300 GB | 20 | 40 GB |
| Totals | 68 | 216 GB |
Unified Endpoint Clusters:
Do you have GPU and/or CPUs available?
We can choose to create Unified Endpoint based on GPU or CPU depending on what is available. CPU is going to be slow. However, it is a worthwhile fallback as the CPU inferencing improvements are always evolving.
Here is sizing for GPU or CPU based Endpoints for gemma-2b-it model inferencing setup. Choose your preference or do a combination of GPU and CPU (GPU endpoint falling back to CPU endpoint)
| Role | No. of Nodes (VM) | vCPU per Node | Memory per Node | Storage per Node | Total vCPU | Total Memory |
|---|---|---|---|---|---|---|
| Control plane | 3 | 4 | 16 GB | 150 GB | 12 | 48 GB |
| Worker | 4 | 12 | 32 GB | 150 GB | 36 | 128 GB |
| GPU | 2 | 20 | 40 GB | 300 GB | 40 | 80 GB |
| Totals | 9 | 88 | 256 GB |
| Role | No. of Nodes (VM) | vCPU per Node | Memory per Node | Storage per Node | Total vCPU | Total Memory |
|---|---|---|---|---|---|---|
| Control plane | 3 | 4 | 16 GB | 150 GB | 12 | 48 GB |
| Worker | 6 | 24 | 32 GB | 150 GB | 36 | 144 GB |
| Totals | 9 | 48 | 192 GB |
Increase Resources on NKP Cluster
We can use kubectl or NKP GUI to increase the NKP node resources.
Change Resources using kubectl:
-
Run the following command to check K8S status of the NKP cluster
-
Get
Clusterdetails -
Edit the
MachineDeploymentdetails -
Change the following parameters
machineDeployments:
- class: default-worker
  name: md-0
  # ... (metadata/annotations are up here) ...
  variables:
    overrides:
    - name: workerConfig
      value:
        # ...
        nutanix:
          machineDetails:
            # CHANGE THESE VALUES:
            memorySize: 32Gi         # e.g., change to 32Gi from current
            vcpuSockets: 24          # e.g., change to 24 from current
            vcpusPerSocket: 1
Change Resources using GUI:
- In NKP Dashboard
- Go to Clusters > Select your cluster (In this lab we have used the Kommander Host Management
nkpmgtcluster) - Go to Nodepools
- Choose the GPU or CPU based workload Nodepools and increase resrouces (Nodes, CPU, and RAM)
API Client Keys
Create API keys to use with our Unified Endpoints.
- In the NAI GUI, go to API Client Keys
-
Click on Create a New Key
- Key Name:
gemma-2-2b-it-key
- Key Name:
-
Download or copy the contents of the key for use during testing.
Download Model
We will download and user llama3 8B model which we sized for in the previous section.
- In the NAI GUI, go to Models
- Click on Import Model from Hugging Face
- Choose the
google/gemma-2-2b-itmodel -
Input your Hugging Face token that was created in the previous section and click Import
-
Provide the Model Instance Name as
google/gemma-2-2b-itand click Import -
Go to VSC Terminal to monitor the download
Get jobs in nai-admin namespacekubens nai-admin ✔ Active namespace is "nai-admin" kubectl get jobs NAME COMPLETIONS DURATION AGE nai-c0d6ca61-1629-43d2-b57a-9f-model-job 0/1 4m56s 4m56Validate creation of pods and PVCkubectl get po,pvc NAME READY STATUS RESTARTS AGE nai-c0d6ca61-1629-43d2-b57a-9f-model-job-9nmff 1/1 Running 0 4m49s NAME STATUS VOLUME CAPACITY ACCESS MODES STORAGECLASS VOLUMEATTRIBUTESCLASS AGE nai-c0d6ca61-1629-43d2-b57a-9f-pvc-claim Bound pvc-a63d27a4-2541-4293-b680-514b8b890fe0 28Gi RWX nai-nfs-storage <unset> 2dVerify download of model using pod logskubectl logs -f nai-c0d6ca61-1629-43d2-b57a-9f-model-job-9nmff /venv/lib/python3.9/site-packages/huggingface_hub/file_download.py:983: UserWarning: Not enough free disk space to download the file. The expected file size is: 0.05 MB. The target location /data/model-files only has 0.00 MB free disk space. warnings.warn( tokenizer_config.json: 100%|██████████| 51.0k/51.0k [00:00<00:00, 3.26MB/s] tokenizer.json: 100%|██████████| 9.09M/9.09M [00:00<00:00, 35.0MB/s]<00:30, 150MB/s] model-00004-of-00004.safetensors: 100%|██████████| 1.17G/1.17G [00:12<00:00, 94.1MB/s] model-00001-of-00004.safetensors: 100%|██████████| 4.98G/4.98G [04:23<00:00, 18.9MB/s] model-00003-of-00004.safetensors: 100%|██████████| 4.92G/4.92G [04:33<00:00, 18.0MB/s] model-00002-of-00004.safetensors: 100%|██████████| 5.00G/5.00G [04:47<00:00, 17.4MB/s] Fetching 16 files: 100%|██████████| 16/16 [05:42<00:00, 21.43s/it]:33<00:52, 9.33MB/s] ## Successfully downloaded model_files|██████████| 5.00G/5.00G [04:47<00:00, 110MB/s] Deleting directory : /data/hf_cache -
Optional - verify the events in the namespace for the pvc creation
$ k get events | awk '{print $1, $3}' 3m43s Scheduled 3m43s SuccessfulAttachVolume 3m36s Pulling 3m29s Pulled 3m29s Created 3m29s Started 3m43s SuccessfulCreate 90s Completed 3m53s Provisioning 3m53s ExternalProvisioning 3m45s ProvisioningSucceeded 3m53s PvcCreateSuccessful 3m48s PvcNotBound 3m43s ModelProcessorJobActive 90s ModelProcessorJobComplete -
Go to NAI UI > Models > Model Access Control
- Choose Hugging Face Model Hub and click on Modify Allowed List
- Select
google/gemma-2-2b-itand click on Save.
We are set with the model and permissions required to create a model.
Create Inference Endpoints
In this section we will create an inference endpoint using the downloaded model.
Note
Both GPU and CPU access are documented here. Choose the procedure available to you.
Info
NAI from v2.3 can host a model up to 7 billion parameters on CPU only Nutanix nodes
- Navigate to Inference Endpoints menu and click on Create Endpoint button
-
Fill the following details based on GPU or CPU availability:
- Endpoint Name:
gemma-2-2b-it-ep-1 - Model Instance Name:
Gemma 2B IT - Purpose: Real Time
- Model Instance Name: select
gemma-2-2b-it - Acceleration Type: CPU
- Endpoint Access - Api Client Keys -
gemma-2-2b-it-key - Inference Engine - vLLM
- No of Instances:
1 - vCPUs (Per Instance) - leave default at
16 - Memory (Per Instance) - leave default at
23
- Endpoint Name:
gemma-2-2b-it-ep-1 - Model Instance Name:
Gemma 2B IT - Use GPUs for running the models :
Checked - No of GPUs (per instance):
- GPU Card:
NVIDIA-L40S(or other available GPU) - Endpoint Access - Api Client Keys -
gemma-2-2b-it-key - Inference Engine: - vLLM
- No of Instances:
1
- Endpoint Name:
-
Confirm the setting and Click on Create
-
Monitor the
nai-adminnamespace to check if the services are coming up -
Check the events in the
nai-adminnamespace for resource usage to make sure there are no errors$ kubectl get events -n nai-admin --sort-by='.lastTimestamp' | awk '{print $1, $3, $5}' 110s FinalizerUpdate Updated 110s FinalizerUpdate Updated 110s RevisionReady Revision 110s ConfigurationReady Configuration 110s LatestReadyUpdate LatestReadyRevisionName 110s Created Created 110s Created Created 110s Created Created 110s InferenceServiceReady InferenceService 110s Created Created -
Once the services are running, check the status of the inference service
-
Create the second endpoint with the following details based on GPU or CPU availability:
- Endpoint Name:
gemma-2-2b-it-ep-2 - Model Instance Name:
Gemma 2B IT - Purpose: Real Time
- Model Instance Name: select
gemma-2-2b-it - Acceleration Type: CPU
- Endpoint Access - Api Client Keys -
gemma-2-2b-it-key - Inference Engine - vLLM
- No of Instances:
1 - vCPUs (Per Instance) - leave default at
16 - Memory (Per Instance) - leave default at
23
- Endpoint Name:
gemma-2-2b-it-ep-2 - Model Instance Name:
Gemma 2B IT - Use GPUs for running the models :
Checked - No of GPUs (per instance):
- GPU Card:
NVIDIA-L40S(or other available GPU) - Endpoint Access - Api Client Keys -
gemma-2-2b-it-key - Inference Engine - vLLM
- No of Instances:
1
- Endpoint Name:
-
Confirm availability of both endpoints either in the GUI or using
kubectlcommands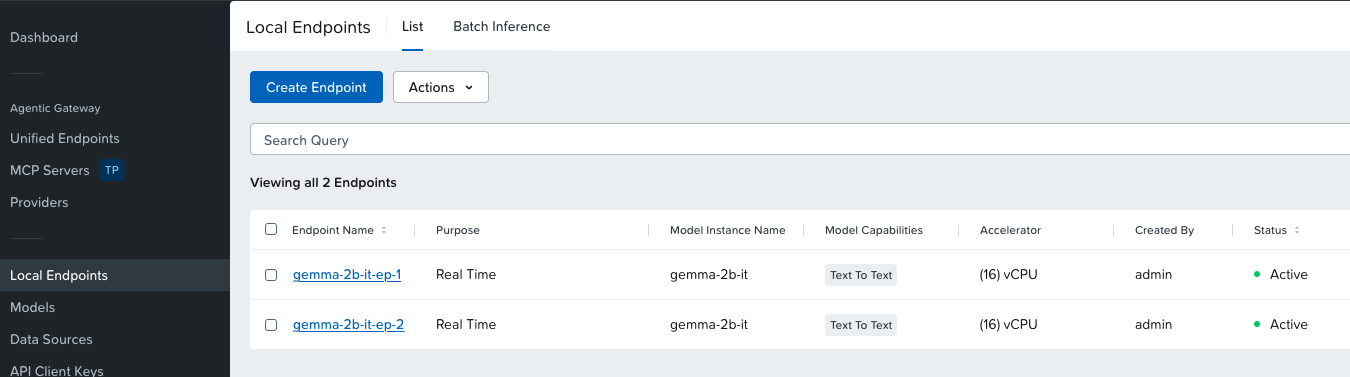
Now we are have everything to create a unified endpoint.
Creating Your First Fallback Unified Endpoint
- Navigate to Unified Endpoints menu and click on Create Unified Endpoint button
-
Fill the following details:
-
Endpoint Name:
unified-ep -
API Spec: Chat
-
Click on Add Model
- Choose
Local -
Add the following endpoints
gemma-2-2b-it-ep-1gemma-2-2b-it-ep-2-
Click Next and select Fallback Order
-
Order 1:
gemma-2-2b-it-ep-1 - Order 2:
gemma-2-2b-it-ep-2
-
Choose the following API Key
- Key Name:
gemma-2-2b-it-key
- Key Name:
-
Confirm the configuration and
- Click Create
Note
The name of the unified endpoint unified-ep will be become the model name where we will be sending inferencing requests.
Test Querying Inference Service API
-
Prepare the API key that was created in the previous section
-
Construct your
curlcommand using the API key obtained above, and run it on the terminalNote the model namecurl -k -X 'POST' 'https://nai.10.x.x.216.nip.io/enterpriseai/gateway/v1/chat/completions' \ -H "Authorization: Bearer $API_KEY" \ -H 'accept: application/json' \ -H 'Content-Type: application/json' \ -d '{ "model": "unified-ep-cpu", "messages": [ { "role": "user", "content": "What is the capital of France?" } ], "stream": false }'{ "id": "9e55abd1-2c91-4dfc-bd04-5db78f65c8b2", "object": "chat.completion", "created": 1728966493, "model": "unified-ep-cpu", "choices": [ { "index": 0, "message": { "role": "assistant", "content": "The capital of France is Paris. It is a historic city on the Seine River in the north-central part of the country. Paris is also the political, cultural, and economic center of France." }, "finish_reason": "stop" } ], "usage": { "prompt_tokens": 17, "completion_tokens": 41, "total_tokens": 58 }, "system_fingerprint": "" }
We have a successful unified endpoint deployment.
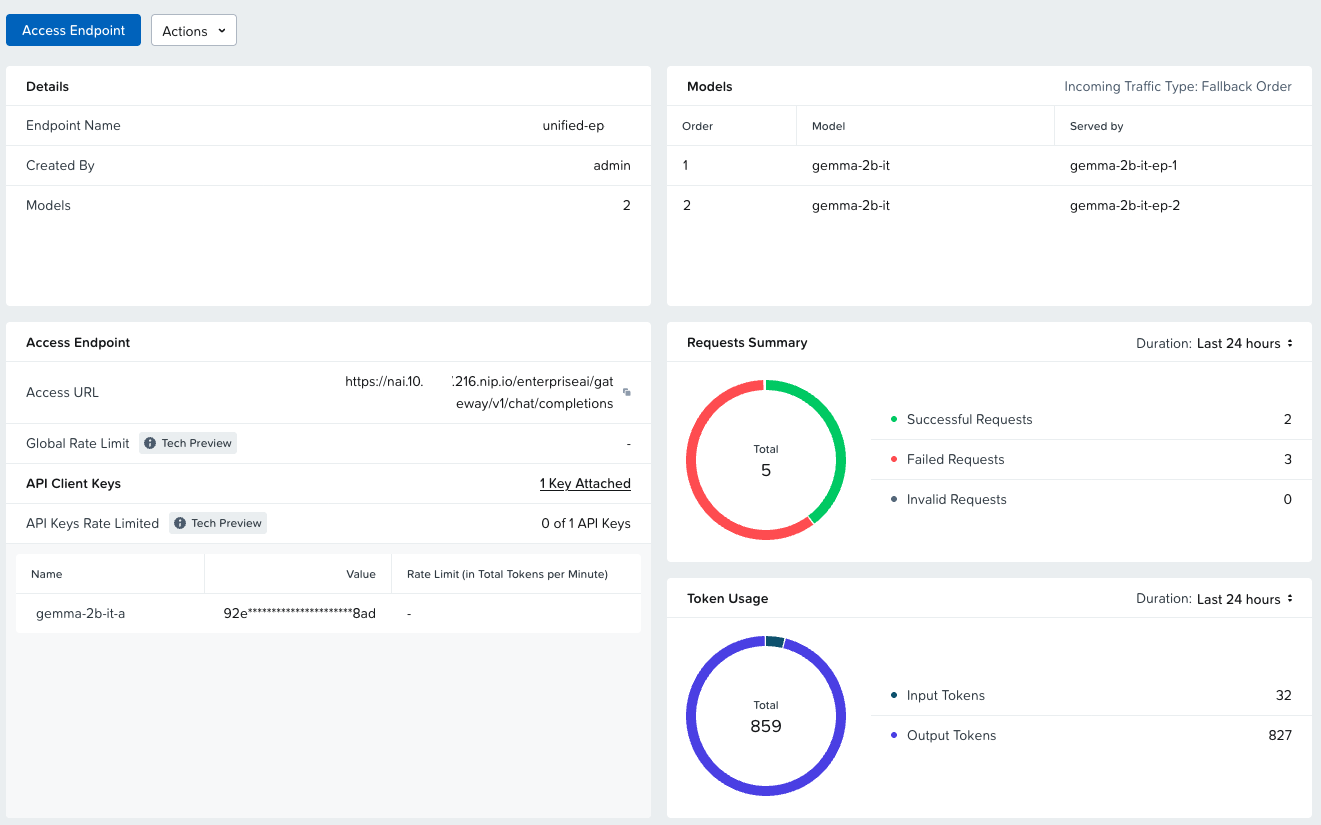
- Go to NAI UI > Unified Endpoints
- Select unified-ep-cpu
-
Check the Overview and Metrics
Availability Testing
In this section we will hibernate one of the local endpoints we created to simulate non-availability of an endpoint and check if the inferencing works.
- In NAI UI, go to Local Endpoints
- Select
gemma-2b-it-ep-1endpoint - Click on Actions drop-down menu and choose Hibernate
- Type hibernate is confirmation window and click on Hibernate
- Confirm hibernation
-
Go to command line and test a query
Note
If you are using CPU based endpoints, the output time will vary based on your CPU and Memory availability we set in the Sizing section.
curl -k -X 'POST' 'https://nai.10.122.7.216.nip.io/enterpriseai/gateway/v1/chat/completions'
 -H "Authorization: Bearer $API_KEY"
 -H 'accept: application/json'  -H 'Content-Type: application/json'
 -d '{
      "model": "unified-ep-cpu",
      "messages": [
        {
          "role": "user",
          "content": "Explain Deep Neural Networks in simple terms"
        }
      ],
      "stream": false
}'
{ "id": "chatcmpl-a0d6d439ad6245fd", "object": "chat.completion", "created": 1780482080, "model": "unified-ep-cpu", "choices": [ { "index": 0, "message": { "role": "assistant", "content": "Imagine you're teaching a dog a new trick. You don't tell them the whole \"How\" at once, right? You show them, give them feedback, and they learn over time. \n\nDeep neural networks are like that, yet for computers. \n\n**Here's the simple breakdown:**\n\n* **It's a network of interconnected neurons:** Just like our brain has neurons, deep neural networks are made of \"artificial neurons\" connected in layers.\n* **Data is the training phase:** To learn, these neural networks are fed tons of data (like pictures of cats or images showing numbers) and their task is to figure out patterns and relationships within the data. Each connection between neurons has a \"weight\" that gets adjusted as the network learns.\n* **Layers work together:** Each layer in the network looks at the data in different ways. The first layer analyzes the image, the second looks for shapes within the image, and the ultimate layer might identify what is being shown: a cat in the picture.\n\n**So, how do they \"learn?\"**\n\n* **Feedforward:** The network takes the data, does a search, compares the search to known answers, and adjusts the weights slightly. \n* **Backpropagation:** This process where the network learns from its mistakes, correcting its searches based on how new data compares to its predictions. Like an expert dog trainer giving feedback after each mistake, guiding its learning.\n\n**What are they good at?**\n\n* **Image recognition:** Identifying objects in pictures (dogs, cats, sunsets, etc.)\n* **Speech recognition:** Understanding what we say and translating it into text. \n* **Predicting outcomes:** Forecasting stock prices, recommending movies, analyzing medical data.\n\n**Key takeaways:**\n\n* Deep neural networks are complex systems, but their inspiration comes from Our brain's complex learning process.\n* They learn from large datasets and adjust can quickly. \n* They're excellent at complex pattern recognition that computers struggle with.\n\n\n**Remember:** It's a simplified explanation. The actual implementation is much more technical, but this gives you a basic understanding. \n" }, "finish_reason": "stop", "content_filter_results": { "hate": { "filtered": false }, "self_harm": { "filtered": false }, "sexual": { "filtered": false }, "violence": { "filtered": false }, "jailbreak": { "filtered": false, "detected": false }, "profanity": { "filtered": false, "detected": false } } } ], "usage": { "prompt_tokens": 16, "completion_tokens": 448, "total_tokens": 464, "prompt_tokens_details": null, "completion_tokens_details": null }, "system_fingerprint": "" }