Deploying Nutanix Enterprise AI (NAI) NVD Reference Application
Version 2.7.0
This version of the NAI deployment is based on the Nutanix Enterprise AI (NAI) v2.7.0 release.
stateDiagram-v2
    direction LR

    state DeployNAI {
        [*] --> DeployNAIAdmin
        DeployNAIAdmin -->  InstallSSLCert
        InstallSSLCert --> DownloadModel
        DownloadModel --> CreateNAI
        CreateNAI --> [*]
    }

    [*] --> PreRequisites
    PreRequisites --> DeployNAI
    DeployNAI --> TestNAI : next section
    TestNAI --> [*]
Prepare for NAI Deployment
GA Software with NAI v2.7.0
In this lab, we will deploy GA version of the following software to test the following:
-
Nutanix Enterprise AI
- Unified Endpoints - multiple endpoints for HA and token-based rate limiting
- Providers - Add remote endpoints from providers to utilize their models in Nutanix Enterprise AI workloads.
Info
Changes in NAI v2.7.0
- Kserve is of at least of
v0.15.0 - Cert-manager is at least of
v1.17.2 - OpenTelemetry operator is at least of
v0.102.0 - Envoy Gateway is at least of
v1.7.0 - Prometheus Monitoring is at least of
78.4.0
Enable Pre-requisite Applications
Warning
Make sure to license NKP cluster with at least NKP Pro License to make use of the NKP Applications catalog to provision NAI (and other applications)
Prometheus
The following pre-requisite applications will be enabled on NKP GUI:
Note
In this lab, we will be using the Management Cluster Workspace to deploy our Nutanix Enterprise AI (NAI)
However, in a customer environment, it is recommended to use a separate workload NKP cluster.
Search and Enable the following applications: follow this order to install dependencies for NAI application
- In the NKP GUI, Go to Clusters
- Click on Management Cluster Workspace
-
Go to Applications to search and enable the following:
- Prometheus Monitoring : version
78.4.0or higher with the followingValuesconfiguration
- Prometheus Monitoring : version
-
Wait for
Deployedstate in the GUI
Cert Manager
Cert Manager is pre-installed on all NKP Clusters. If not installed, use the following method to install:
- In the NKP GUI, Go to Clusters
- Click on Management Cluster Workspace
-
Go to Applications to search and enable the following:
- Cert-manager-
v1.17.2
- Cert-manager-
-
Wait for
Deployedstate in the GUI
Envoy Gateway
-
Open Terminal in
VSCode -
Run the command to load the environment variables
-
Install Envoy Gateway CRDs
v1.7.0in AI gateway modePulled: docker.io/envoyproxy/gateway-crds-helm:v1.7.0 Digest: sha256:e94d3fdf5d4cb08e2c8efa8c1da133b9804c2e88a3acb4d0e20adb8755a60174 customresourcedefinition.apiextensions.k8s.io/backendtlspolicies.gateway.networking.k8s.io serverside-applied customresourcedefinition.apiextensions.k8s.io/gatewayclasses.gateway.networking.k8s.io serverside-applied customresourcedefinition.apiextensions.k8s.io/gateways.gateway.networking.k8s.io serverside-applied customresourcedefinition.apiextensions.k8s.io/grpcroutes.gateway.networking.k8s.io serverside-applied customresourcedefinition.apiextensions.k8s.io/httproutes.gateway.networking.k8s.io serverside-applied customresourcedefinition.apiextensions.k8s.io/referencegrants.gateway.networking.k8s.io serverside-applied customresourcedefinition.apiextensions.k8s.io/tcproutes.gateway.networking.k8s.io serverside-applied customresourcedefinition.apiextensions.k8s.io/tlsroutes.gateway.networking.k8s.io serverside-applied customresourcedefinition.apiextensions.k8s.io/udproutes.gateway.networking.k8s.io serverside-applied customresourcedefinition.apiextensions.k8s.io/xbackendtrafficpolicies.gateway.networking.x-k8s.io serverside-applied customresourcedefinition.apiextensions.k8s.io/xlistenersets.gateway.networking.x-k8s.io serverside-applied customresourcedefinition.apiextensions.k8s.io/xmeshes.gateway.networking.x-k8s.io serverside-applied customresourcedefinition.apiextensions.k8s.io/backends.gateway.envoyproxy.io serverside-applied customresourcedefinition.apiextensions.k8s.io/backendtrafficpolicies.gateway.envoyproxy.io serverside-applied customresourcedefinition.apiextensions.k8s.io/clienttrafficpolicies.gateway.envoyproxy.io serverside-applied customresourcedefinition.apiextensions.k8s.io/envoyextensionpolicies.gateway.envoyproxy.io serverside-applied customresourcedefinition.apiextensions.k8s.io/envoypatchpolicies.gateway.envoyproxy.io serverside-applied customresourcedefinition.apiextensions.k8s.io/envoyproxies.gateway.envoyproxy.io serverside-applied customresourcedefinition.apiextensions.k8s.io/httproutefilters.gateway.envoyproxy.io serverside-applied customresourcedefinition.apiextensions.k8s.io/securitypolicies.gateway.envoyproxy.io serverside-applied -
Create the AI Gateway mode configuration template file
eg-config-for-gateway-mode.yamlto enable advanced featuresconfig: envoyGateway: gateway: controllerName: "gateway.envoyproxy.io/gatewayclass-controller" logging: level: default: "info" provider: kubernetes: rateLimitDeployment: container: image: "docker.io/envoyproxy/ratelimit:99d85510" patch: type: "StrategicMerge" value: spec: template: spec: containers: - imagePullPolicy: "IfNotPresent" name: "envoy-ratelimit" image: "docker.io/envoyproxy/ratelimit:99d85510" type: "Kubernetes" extensionApis: enableEnvoyPatchPolicy: true enableBackend: true extensionManager: maxMessageSize: 11Mi backendResources: - group: inference.networking.k8s.io kind: InferencePool version: v1 hooks: xdsTranslator: translation: listener: includeAll: true route: includeAll: true cluster: includeAll: true secret: includeAll: true post: - "Translation" - "Cluster" - "Route" service: fqdn: hostname: "ai-gateway-controller.nai-system.svc.cluster.local" port: 1063 rateLimit: backend: type: "Redis" redis: url: "redis-sentinel.nai-system.svc.cluster.local:6379" -
Install Envoy Gateway
v1.7.0Pulled: docker.io/envoyproxy/gateway-helm:v1.7.0 Digest: sha256:6dca101fdc0d41c702c1070eb42db119a2768a33388ba28041ae615cbe262aaf Release "eg" has been upgraded. Happy Helming! NAME: eg LAST DEPLOYED: Sat Apr 4 08:34:21 2026 NAMESPACE: envoy-gateway-system STATUS: deployed REVISION: 2 TEST SUITE: None NOTES: ************************************************************************** *** PLEASE BE PATIENT: Envoy Gateway may take a few minutes to install *** ************************************************************************** Envoy Gateway is an open source project for managing Envoy Proxy as a standalone or Kubernetes-based application gateway. Thank you for installing Envoy Gateway! 🎉 Your release is named: eg. 🎉 Your release is in namespace: envoy-gateway-system. 🎉 To learn more about the release, try: $ helm status eg -n envoy-gateway-system $ helm get all eg -n envoy-gateway-system To have a quickstart of Envoy Gateway, please refer to https://gateway.envoyproxy.io/latest/tasks/quickstart. To get more details, please visit https://gateway.envoyproxy.io and https://github.com/envoyproxy/gateway. -
Check if Envoy Gateway resources are ready
Warning
The
envoy-ratelimit-pod will temporarily be inCrashLoopBackOffstate and eventually will transition toRunningafter redis-standalone pod is fully deployed in the upcoming Deploy NAI section.Ignore the
CrashLoopBackOffstate for now and move on to the next section.
Kserve
-
Open
$HOME/.envfile inVSCode -
Add (append) the following line and save it
-
Load the
.envvariables -
Install
kserveusing the following commandsPulled: ghcr.io/kserve/charts/kserve-crd:v0.15.0 Digest: sha256:57ad1a5475fd625cb558214ba711752aa77b7d91686a391a5f5320cfa72f3fa8 Release "kserve-crd" has been upgraded. Happy Helming! NAME: kserve-crd LAST DEPLOYED: Sun May 30 08:40:05 2026 NAMESPACE: kserve STATUS: deployed REVISION: 2 TEST SUITE: None -
Check if
kservepods are running
OpenTelemetry
-
Install OpenTelemetry Operator:
Release "opentelemetry-operator" has been upgraded. Happy Helming!
NAME: opentelemetry-operator
LAST DEPLOYED: Sun May 30 08:42:05 2026
NAMESPACE: opentelemetry
STATUS: deployed
REVISION: 2
NOTES:
[WARNING] No resource limits or requests were set. Consider setter resource requests and limits via the `resources` field.


opentelemetry-operator has been installed. Check its status by running:
  kubectl --namespace opentelemetry get pods -l "app.kubernetes.io/instance=opentelemetry-operator"

Visit https://github.com/open-telemetry/opentelemetry-operator for instructions on how to create & configure OpenTelemetryCollector and Instrumentation custom resources by using the Operator.
Note
It may take a few minutes for each application to be up and running. Monitor the deployment to make sure that these applications are running before moving on to the next section.
Deploy NAI
We will use the Docker login credentials we created in the previous section to download the NAI Docker images.
Change the Docker login credentials
The following Docker based environment variable values need to be changed from your own Docker environment variables to the credentials downloaded from Nutanix Portal.
$DOCKER_NAI_USERNAME$DOCKER_NAI_ASSWORD$DOCKER_NAI_EMAIL
-
Open
$HOME/.envfile inVSCode -
Add (append) the following environment variables and save it
export REGISTRY_SECRET_NAME=_k8s_secret_for_nai export DOCKER_SERVER=https://index.docker.io/v1/ export DOCKER_NAI_USERNAME=_GA_release_docker_username export DOCKER_NAI_PASSWORD=_GA_release_docker_password export DOCKER_NAI_EMAIL=_GA_release_docker_email export NAI_CORE_VERSION=_GA_release_nai_core_version export NAI_API_RWX_STORAGECLASS=_nkp_rwx_storage_class export NAI_DEFAULT_RWO_STORAGECLASS=_nkp_rwo_storage_class export NKP_WORKSPACE_NAMESPACE=_nkp_workspace name # (1)!-
To get the workspace namespace, run the following commmand. Note the WORKSPACE NAMESPACE column in the output
export REGISTRY_SECRET_NAME=nai-regcred export DOCKER_SERVER=https://index.docker.io/v1/ export DOCKER_NAI_USERNAME=ntnxsvcgpt export DOCKER_NAI_PASSWORD=dckr_pat_XXXXXXXXXXXXXXXXXXXXXXXXX export DOCKER_NAI_EMAIL=ntnxsvcgpt export NAI_CORE_VERSION=2.7.0 export NAI_API_RWX_STORAGECLASS=nai-nfs-storage export NAI_DEFAULT_RWO_STORAGECLASS=nutanix-volume export NKP_WORKSPACE_NAMESPACE=kommander -
-
Source the environment variables
-
Create the nai-system namespace to install Nutanix Enterprise AI
-
Create docker registry Secrets in both
nai-systemandenvoy-gateway-systemnamespaces. -
Add NAI helm charts
-
Search and confirm if NAI
v2.7.0charts are available$ helm search repo ntnx-charts/nai-core --versions # NAME CHART VERSION APP VERSION DESCRIPTION ntnx-charts/nai-operators 2.7.0 0.1.0 A Helm chart for CRDs and Operators required by... ntnx-charts/nai-operators 2.7.0 0.1.0 A Helm chart for CRDs and Operators required by... ntnx-charts/nai-operators 2.5.0 0.1.0 A Helm chart for CRDs and Operators required by... NAME CHART VERSION APP VERSION DESCRIPTION ntnx-charts/nai-core 2.7.0 0.1.0 A Helm chart for NAI core components ntnx-charts/nai-core 2.7.0 0.1.0 A Helm chart for NAI core components ntnx-charts/nai-core 2.5.0 0.1.0 A Helm chart for NAI core components ntnx-charts/nai-core 2.4.0 0.1.0 A Helm chart for NAI core components ntnx-charts/nai-core 2.3.0 0.1.0 A Helm chart for NAI core components -
Install NAI operator
-
Check if all NAI operator pods are running
-
Install NAI core in AI gateway mode
Info
This installation takes about 5-10 minutes depending on the available resources
helm upgrade --install nai-core ntnx-charts/nai-core \
  --version 2.7.0 -n nai-system --create-namespace \
  --force-conflicts --wait \
  --set "global.imagePullSecrets[0].name=${REGISTRY_SECRET_NAME}" \
  --set "global.storage.storageClassNameRWX=${NAI_API_RWX_STORAGECLASS}" \
  --set "global.storage.storageClassName=${NAI_DEFAULT_RWO_STORAGECLASS}" \
  --set "naiMonitoring.nodeExporter.serviceMonitor.namespaceSelector.matchNames[0]=${NKP_WORKSPACE_NAMESPACE}" \
  --set "naiMonitoring.dcgmExporter.serviceMonitor.namespaceSelector.matchNames[0]=${NKP_WORKSPACE_NAMESPACE}" \
  --insecure-skip-tls-verify
helm upgrade --install nai-core ntnx-charts/nai-core \ --version 2.7.0 -n nai-system --create-namespace \ --force-conflicts --wait \ --set "global.imagePullSecrets[0].name=nai-regcred" \ --set "global.storage.storageClassNameRWX=nai-nfs-storage" \ --set "global.storage.storageClassName=nutanix-volume" \ --set "naiMonitoring.nodeExporter.serviceMonitor.namespaceSelector.matchNames[0]=kommander" \ --set "naiMonitoring.dcgmExporter.serviceMonitor.namespaceSelector.matchNames[0]=kommander" \ --insecure-skip-tls-verify -
Verify that the NAI Core Pods are running and healthy - there should be more jobs completing and pods coming up to establish NAI functionality
Active namespace is "nai-system".

NAME                                                    READY   STATUS      RESTARTS   AGE
ai-gateway-controller-d6bb9d79b-qrml2                   1/1     Running     0             6m
chi-nai-clickhouse-server-chcluster1-0-0-0              1/1     Running     0             6m
chk-nai-clickhouse-keeper-chkeeper-0-0-0                1/1     Running     0             6m
iam-database-bootstrap-cfwxl-zljjl                      0/1     Completed   0             6m
iam-proxy-7756b78f4c-nqswf                              1/1     Running     0             6m
iam-proxy-control-plane-64d65947bf-lgx5x                1/1     Running     0             6m
iam-themis-b4bffcf6d-ssg5f                              1/1     Running     1 (1m ago)    6m
iam-themis-bootstrap-6rqfk-xf2lm                        0/1     Completed   0             6m
iam-ui-c57c768d-fg7b7                                   1/1     Running     0             6m
iam-user-authn-d9c68c9f7-nm4sf                          1/1     Running     0             6m
nai-agent-7fd556556f-6t7f9                              1/1     Running     0             6m
nai-api-77bcff5b4f-hdnp6                                1/1     Running     2 (1m ago)    6m
nai-api-db-migrate-wiojv-9v2p8                          0/1     Completed   2             6m
nai-clickhouse-schema-job-1780198147-q9drf              0/1     Completed   0             6m
nai-db-0                                                1/1     Running     0             6m
nai-iep-model-controller-56f79987c7-nhj7t               1/1     Running     0             6m
nai-oauth2-proxy-86c574869c-6vw54                       1/1     Running     0             6m
nai-operators-nai-clickhouse-operator-f8f666db9-2746s   2/2     Running     0             6m
nai-otel-collector-collector-29qwn                      1/1     Running     0             6m
nai-otel-collector-collector-78lcj                      1/1     Running     0             6m
nai-otel-collector-collector-rp7nt                      1/1     Running     0             6m
nai-otel-collector-collector-s6j7c                      1/1     Running     0             6m
nai-otel-collector-collector-tqxj7                      1/1     Running     0             6m
nai-otel-collector-collector-trbqn                      1/1     Running     0             6m
nai-otel-collector-collector-xgcmb                      1/1     Running     0             6m
nai-otel-collector-targetallocator-75799c778-h2wf2      1/1     Running     0             6m
nai-pulse-job-29671205-4t2kp                            0/1     Completed   0             7m
nai-securityscan-manager-c6bc5c8b4-v5jfn                1/1     Running     4 (1m ago)    6m
nai-ui-557f5f6c89-xjlzt                                 1/1     Running     0             6m
redis-standalone-cf49969d-pzqmt                         2/2     Running     0             6m
Install SSL Certificate and Gateway Elements
In this section we will install SSL Certificate to access the NAI UI. This is required as the endpoint will only work with a ssl endpoint with a valid certificate.
NAI UI is accessible using the Envoy Ingress Gateway.
Optional and manual - using Public Certificate Authority (CA)
If an organization generates certificates using a different mechanism then obtain the certificate + key and create a kubernetes secret manually using the following command:
-
Create the certificate from the files (generated using certbot or provided to you)
-
Combine the certificates to get the certificate bundle
-
Create a kubernetes secret in the nai-system namespace to use during NAI install
-
Patch the Envoy gateway with the
nai-certcertificate details
Optional to automate - using Public Certificate Authority (CA) and Cert Manager
Using Cert Manager to manage the Public Certificate Authority (CA) for NAI SSL Certificate is also a possiblity.
At a high level (Cloudflare Example):
- Get a API key from DNS provider woth Edit Zone rights
-
Create a Kubernetes
Secretfrom the API key -
Create a
ClusterIssuerwith Cert Mangager/Let's Encrypt - Configure cert-manager to use DNS-01 challenge with Cloudflare for automatic certificate issuance.apiVersion: cert-manager.io/v1 kind: ClusterIssuer metadata: name: letsencrypt-cloudflare namespace: cert-manager spec: acme: email: _YOUR_DOMAIN_OWNER_EMAIL_ADDRESS server: https://acme-v02.api.letsencrypt.org/directory privateKeySecretRef: name: letsencrypt-cloudflare-account-key solvers: - dns01: cloudflare: apiTokenSecretRef: name: cloudflare-api-token-secret key: api-tokenapiVersion: cert-manager.io/v1 kind: ClusterIssuer metadata: name: letsencrypt-cloudflare spec: acme: email: _YOUR_DOMAIN_OWNER_EMAIL_ADDRESS server: https://acme-v02.api.letsencrypt.org/directory privateKeySecretRef: name: nai-letsencrypt-cluster solvers: - dns01: route53: region: us-east-1 accessKeyIDSecretRef: name: route53-api-token-secret key: access-key-id secretAccessKeySecretRef: name: route53-api-token-secret key: secret-access-key hostedZoneID: _HOSTED_ZONE_ID -
Create the ingress resource certificate using the following command:
-
Patch the Envoy gateway with the
nai-certcertificate details
The following steps show how cert-manager can be used to generate a self signed certificate using the default selfsigned-issuer present in the cluster for the purposes of the lab.
-
Get the NAI UI ingress gateway host using the following command:
-
Get the value of
NAI_UI_ENDPOINTenvironment variable -
We will use the command output e.g:
10.x.x.216as the IP address for NAI as reserved in this section -
Construct the FQDN of NAI UI using nip.io and we will use this FQDN as the certificate's Common Name (CN).
-
Create the ingress resource certificate using the following command:
cat << EOF | k apply -f - apiVersion: cert-manager.io/v1 kind: Certificate metadata: name: nai-cert namespace: nai-system spec: issuerRef: name: selfsigned-issuer kind: ClusterIssuer secretName: nai-cert commonName: nai.${NAI_UI_ENDPOINT}.nip.io dnsNames: - nai.${NAI_UI_ENDPOINT}.nip.io ipAddresses: - ${NAI_UI_ENDPOINT} EOF -
Patch the Envoy gateway with the
nai-certcertificate details -
Create EnvoyProxy
-
Patch the
nai-ingress-gatewayresource with the newEnvoyProxydetails
Accessing the UI
-
In a browser, open the following URL to connect to the NAI UI
-
Change the password for the
adminuser -
Login using
adminuser and password.
Download Model
We will download and user llama3 8B model which we sized for in the previous section.
- In the NAI GUI, go to Models
- Click on Import Model from Hugging Face
- Choose the
meta-llama/Meta-Llama-3.1-8B-Instructmodel -
Input your Hugging Face token that was created in the previous section and click Import
-
Provide the Model Instance Name as
Meta-Llama-3.1-8B-Instructand click Import -
Go to VSC Terminal to monitor the download
Get jobs in nai-admin namespacekubens nai-admin ✔ Active namespace is "nai-admin" kubectl get jobs NAME COMPLETIONS DURATION AGE nai-c0d6ca61-1629-43d2-b57a-9f-model-job 0/1 4m56s 4m56Validate creation of pods and PVCkubectl get po,pvc NAME READY STATUS RESTARTS AGE nai-c0d6ca61-1629-43d2-b57a-9f-model-job-9nmff 1/1 Running 0 4m49s NAME STATUS VOLUME CAPACITY ACCESS MODES STORAGECLASS VOLUMEATTRIBUTESCLASS AGE nai-c0d6ca61-1629-43d2-b57a-9f-pvc-claim Bound pvc-a63d27a4-2541-4293-b680-514b8b890fe0 28Gi RWX nai-nfs-storage <unset> 2dVerify download of model using pod logskubectl logs -f nai-c0d6ca61-1629-43d2-b57a-9f-model-job-9nmff /venv/lib/python3.9/site-packages/huggingface_hub/file_download.py:983: UserWarning: Not enough free disk space to download the file. The expected file size is: 0.05 MB. The target location /data/model-files only has 0.00 MB free disk space. warnings.warn( tokenizer_config.json: 100%|██████████| 51.0k/51.0k [00:00<00:00, 3.26MB/s] tokenizer.json: 100%|██████████| 9.09M/9.09M [00:00<00:00, 35.0MB/s]<00:30, 150MB/s] model-00004-of-00004.safetensors: 100%|██████████| 1.17G/1.17G [00:12<00:00, 94.1MB/s] model-00001-of-00004.safetensors: 100%|██████████| 4.98G/4.98G [04:23<00:00, 18.9MB/s] model-00003-of-00004.safetensors: 100%|██████████| 4.92G/4.92G [04:33<00:00, 18.0MB/s] model-00002-of-00004.safetensors: 100%|██████████| 5.00G/5.00G [04:47<00:00, 17.4MB/s] Fetching 16 files: 100%|██████████| 16/16 [05:42<00:00, 21.43s/it]:33<00:52, 9.33MB/s] ## Successfully downloaded model_files|██████████| 5.00G/5.00G [04:47<00:00, 110MB/s] Deleting directory : /data/hf_cache -
Optional - verify the events in the namespace for the pvc creation
$ k get events | awk '{print $1, $3}'

3m43s Scheduled
3m43s SuccessfulAttachVolume
3m36s Pulling
3m29s Pulled
3m29s Created
3m29s Started
3m43s SuccessfulCreate
90s   Completed
3m53s Provisioning
3m53s ExternalProvisioning
3m45s ProvisioningSucceeded
3m53s PvcCreateSuccessful
3m48s PvcNotBound
3m43s ModelProcessorJobActive
90s   ModelProcessorJobComplete
The model is downloaded to the Nutanix Files pvc volume.
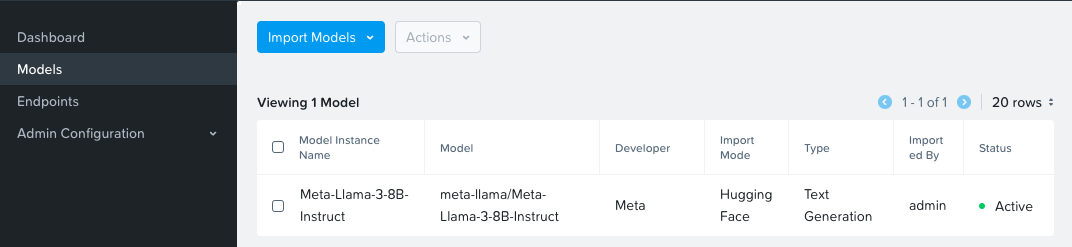
After a successful model import, you will see it in Active status in the NAI UI under Models menu
Create and Test Inference Endpoint
In this section we will create an inference endpoint using the downloaded model.
- Navigate to Inference Endpoints menu and click on Create Endpoint button
-
Fill the following details based on GPU or CPU availability:
Info
NAI from
v2.3can host a model up to 7 billion parameters on CPU only Nutanix nodes- Endpoint Name:
llama-8b - Model Instance Name:
Meta-LLaMA-8B-Instruct - Use GPUs for running the models :
Checked - No of GPUs (per instance):
- GPU Card:
NVIDIA-L40S(or other available GPU) - No of Instances:
1 - API Keys: Create a new API key or use an existing one
- Endpoint Name:
llama-8b - Model Instance Name:
Meta-LLaMA-8B-Instruct - Use GPUs for running the models :
leave unchecked - No of Instances:
1 - API Keys: Create a new API key or use an existing one
- Endpoint Name:
-
Click on Create
-
Monitor the
nai-adminnamespace to check if the services are coming up -
Check the events in the
nai-adminnamespace for resource usage to make sure there are no errors$ kubectl get events -n nai-admin --sort-by='.lastTimestamp' | awk '{print $1, $3, $5}' 110s FinalizerUpdate Updated 110s FinalizerUpdate Updated 110s RevisionReady Revision 110s ConfigurationReady Configuration 110s LatestReadyUpdate LatestReadyRevisionName 110s Created Created 110s Created Created 110s Created Created 110s InferenceServiceReady InferenceService 110s Created Created -
Once the services are running, check the status of the inference service